
Picture this: you’re in the middle of an important project, and suddenly, your laptop screen goes dark. Frustrating, right?
But don’t worry, you’re not alone. Many people face this issue, and the good news is that you can fix it yourself. Replacing a laptop screen might sound complicated, but with the right guidance, you can save money and regain your peace of mind.
This guide is designed for you. Whether you’re a tech enthusiast or just someone looking to fix their laptop, we’ll walk you through the process step-by-step. You’ll learn how to identify the problem, gather the necessary tools, and successfully replace your laptop screen. Imagine the satisfaction of solving the problem with your own hands. As you read on, you’ll discover that the solution is simpler than you think. Let’s get started!
Tools And Materials Needed
Replacing a laptop screen requires essential tools like screwdrivers, a plastic spudger, and a new screen. Materials include an anti-static mat to prevent electric discharge and a microfiber cloth for cleaning. Carefully follow instructions to ensure a smooth replacement process.
Replacing a laptop screen can feel like a daunting task if you don’t have the right tools and materials. But with a bit of guidance, you’ll find it’s quite manageable. Before you dive in, ensure you have everything you need for a smooth repair process. Getting your tools ready beforehand can save you a lot of time and frustration.Essential Tools
Having the right tools is crucial to replace your laptop screen effectively. You’ll need a small Phillips screwdriver to remove the screws that hold the screen in place. A flathead screwdriver or a plastic prying tool is also essential for gently separating the screen bezel from the frame without causing damage. A pair of tweezers can be a lifesaver for handling small screws and connectors. They help you navigate the tight spaces in your laptop’s interior. Make sure you also have a microfiber cloth handy to clean the new screen before installation.Required Materials
Gathering the necessary materials is just as important as having the right tools. First, you’ll need a replacement screen specific to your laptop model. Check the model number on your existing screen before purchasing a new one to ensure compatibility. Keep a small container or magnetic mat nearby to organize screws and small components. Losing even one screw can make the assembly difficult. Additionally, consider using an anti-static wrist strap to prevent static electricity from damaging sensitive laptop components.Optional Extras
While not mandatory, having a laptop repair toolkit can be advantageous. These kits often come with various tools that might be useful for other repairs in the future. They can be a good investment if you often find yourself fixing electronics. An instructional guide or video related to your specific laptop model can provide step-by-step assistance. It’s like having a virtual repair buddy guiding you through the process. This can be especially helpful if you’re a visual learner or new to laptop repairs.Getting Ready
Before you start, double-check that you have everything laid out. Are you the type to jump into tasks only to find you’re missing a crucial piece? Avoid this common pitfall by preparing a checklist and ticking off each item as you gather it. Have you ever tried fixing something, only to realize halfway through that you’re missing an essential tool? It’s frustrating, isn’t it? Ensuring you have all the tools and materials ready will make your screen replacement experience much smoother. Do you have any personal tips or tricks that have helped you in DIY tasks like this? Share your thoughts below and help fellow readers in their repair journeys!
Credit: www.laptopscreen.com
Safety Precautions
Replacing a laptop screen can be a daunting task. Safety is the key concern during this process. Protecting yourself and your device is essential. Follow these safety precautions to ensure a smooth and safe replacement.
Check For Static Electricity
Static electricity can damage electronic components. Use an anti-static wrist strap. It helps discharge static electricity safely.
Disconnect Power Supply
Unplug the laptop from any power source. Remove the battery if possible. This prevents electrical shocks.
Wear Protective Gear
Wear safety goggles to shield your eyes. Gloves protect your hands from sharp edges. Ensures personal safety during the task.
Organize Work Area
Keep your workspace tidy. Use a soft cloth to avoid scratches. Organize tools to prevent losing small parts.
Avoid Liquid Spills
Keep liquids away from the work area. Spills can damage components. They also increase the risk of electric shock.
Handle Screen With Care
Screen is fragile and sensitive. Handle it gently to avoid cracks. Use both hands to support it.
Follow Instructions
Read the replacement guide carefully. Follow each step precisely. Ensures proper installation and safety.
Check Compatibility
Ensure the new screen matches the laptop model. Wrong screen can cause damage. Verify specifications before starting.
Identifying Screen Type
Replacing a laptop screen can be tricky. Identifying the right screen type is crucial. You must know which screen fits your laptop. This ensures a smooth replacement process. Different laptops use different screens. Identifying the correct screen type saves time and money.
Understand Your Laptop Model
The laptop model number helps identify the screen type. Locate this number on the bottom of your laptop. Write it down carefully. This number is key to finding the right screen. Each model has specific screen requirements. Knowing the model number simplifies the search.
Check Screen Size
Screen size matters. Measure diagonally from corner to corner. This gives the accurate size. Screen sizes vary. Common sizes include 13-inch, 15-inch, and 17-inch. Ensure you get the exact size. A mismatch can cause problems during installation.
Identify Screen Resolution
Resolution affects display quality. Know your screen’s resolution. Check settings on your laptop. Popular resolutions include HD, Full HD, and 4K. A higher resolution offers better clarity. Choose a screen that matches your resolution needs.
Determine Screen Type: Lcd Vs. Led
Two main types are LCD and LED. LCD screens are common. They use liquid crystals. LED screens are newer. They use light-emitting diodes. LED offers better energy efficiency. Know which type your laptop uses. This ensures compatibility and performance.
Assess Touchscreen Features
Some laptops have touchscreens. Determine if your screen is touch-enabled. Touchscreens require different screens. Check your laptop’s features list. Replace with a touchscreen if needed. This maintains functionality.
Consult Manufacturer Specifications
Manufacturers provide screen details. Visit the manufacturer’s website. Look for screen specifications. This confirms the type and size needed. Trust manufacturer information. It provides accurate guidance.
Credit: primetechsupport.com
Removing The Power Source
Before replacing your laptop screen, disconnect the power source to ensure safety. This prevents electrical accidents and protects your device. Always handle electronic components with care to avoid damage.
Replacing a laptop screen might seem daunting at first, but breaking it down into manageable steps can make the task much simpler. One of the most crucial steps is removing the power source. You might wonder why this is so important. Simply put, it ensures safety and prevents any electrical mishaps. Disconnecting power is the first step to a smooth and safe screen replacement.Disconnect The Charger
Start by unplugging the charger from your laptop. This is your first line of defense against unexpected electrical shocks or damage. Even if the laptop is off, electricity can still flow through the charger. You don’t want to risk a short circuit.Remove The Battery
Next, turn your laptop over and locate the battery compartment. Most laptops have a latch or slider that allows easy battery removal. If your laptop has a built-in battery, you might need to use a screwdriver to access it. Removing the battery cuts off all power and ensures your screen replacement process is safe.Check For Residual Power
Once the battery is out, press the power button for about 10-15 seconds. This step drains any remaining power in the laptop. It might seem insignificant, but residual power can pose risks during hardware tasks. A quick press might just save you from potential risks. Taking these steps seriously not only protects you but also preserves your laptop. Have you ever overlooked a simple detail that led to a bigger issue? This is why even small steps, like removing the power source, are crucial. They ensure your DIY repair journey is smooth and hassle-free.Disassembling The Laptop
Disassembling your laptop might feel like a daunting task, but with a little patience and the right tools, you can do it. It’s not just about getting to the screen but understanding your laptop’s inner workings. As you embark on this journey, remember that each step brings you closer to restoring your device to its former glory.
Unscrewing The Frame
Start by turning off your laptop and disconnecting all power sources. This includes unplugging the charger and removing the battery. Safety first, right?
Locate the screws on the laptop’s frame. They are often hidden under rubber pads or stickers, so keep an eye out. Use a precision screwdriver to gently remove these screws, keeping them safe. Losing them can be a real headache.
As you unscrew, think about how each piece connects. This isn’t just about taking it apart. It’s about understanding how your laptop fits together. Ever wondered why those screws are so tiny? They keep your laptop sleek and compact.
Removing The Bezel
With the frame screws out, it’s time to tackle the bezel. This is the thin plastic frame around your screen. Carefully use a plastic opening tool to pry it open. Avoid metal tools, as they can scratch the surface.
Work your way around the bezel, gently popping it off. It’s not about brute force. A gentle touch ensures you don’t snap anything. Remember, patience is key.
As you remove the bezel, you’ll reveal the screen’s mounting brackets. This sight can be quite satisfying, knowing you’re halfway through the process. Doesn’t it make you wonder about the craftsmanship behind these devices?
Disassembling a laptop is more than technical work; it’s a peek into the world of modern engineering. Are you ready to continue this journey?
Disconnecting The Old Screen
Disconnecting the old screen from your laptop is a crucial step. It requires patience and attention to detail. This process can seem daunting, but it’s manageable with the right guidance. Follow these steps to ensure a smooth disconnection. Your new screen will soon be ready for installation.
Step 1: Power Down The Laptop
Ensure your laptop is turned off completely. Unplug it from the power source. Remove the battery if it’s detachable. This step prevents electrical hazards and protects components.
Step 2: Remove The Bezel
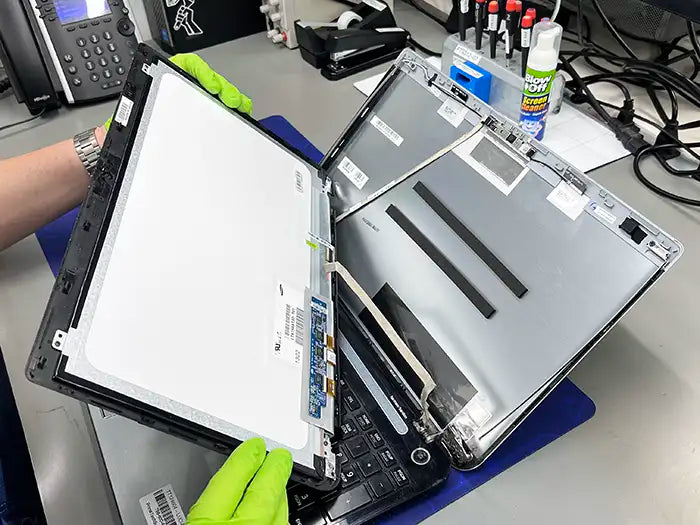
The bezel is the frame surrounding the screen. Use a plastic tool to gently pry it off. Start at a corner and work your way around. Be careful not to crack it.
Step 3: Unscrew The Screen
Locate the screws holding the screen in place. These are usually at the corners. Use a small screwdriver to remove them. Keep the screws safe for later use.
Step 4: Disconnect The Video Cable
The video cable connects the screen to the motherboard. Locate the cable at the back of the screen. Gently pull the cable to disconnect. Avoid yanking to prevent damage.
Step 5: Remove The Old Screen
With the screws and cable detached, lift the screen carefully. Place it aside safely. Your laptop is now ready for the new screen.
Installing The New Screen
Installing a new laptop screen sounds challenging, but it’s doable. With careful steps, you can have a shiny, functional display in no time. Follow the instructions carefully to ensure a smooth installation process. Let’s dive into the steps involved in installing the new screen.
Connecting The Cables
First, locate the cable connectors on your laptop. These are usually near the bottom of the screen. Carefully align the new screen’s cables with the connectors. Ensure a snug fit to avoid loose connections.
Press gently on the connectors to secure them. Double-check the alignment and connection. A loose connection can cause display issues.
Securing The Screen
Next, position the screen in place. Use screws to attach the screen to the frame. Make sure to tighten each screw properly.
Work systematically from one side to the other. This method ensures even pressure and prevents screen damage. Once secured, check for any gaps or misalignments.
Adjust the screen if necessary. A well-secured screen will function efficiently. Take your time and be patient during this step.

Credit: www.youtube.com
Reassembling The Laptop
Replacing a laptop screen involves several steps. Start by gathering necessary tools like screwdrivers. Carefully detach the old screen, ensuring all screws and cables are removed. Install the new screen by securely connecting the cables and tightening the screws. Test the new display before reassembling the laptop.
Reassembling your laptop after replacing its screen can be a surprisingly gratifying experience. You’ve taken apart the pieces, replaced the necessary component, and now it’s time to bring everything back together. It’s like completing a puzzle with the satisfaction of knowing you did it yourself. But, how do you ensure everything fits perfectly without missing a step? Let’s dive into the process with clarity and ease.Preparing To Reassemble
Before you jump into reassembling, ensure all the components are clean and free of dust. A soft brush or compressed air can help clear debris, which could affect your laptop’s performance. Lay out your screws and tools so they’re easily accessible.Connecting The Display Cable
Start by reconnecting the display cable. This is crucial, as it’s the lifeline of your screen. Make sure it’s secured tightly to avoid flickering or display issues. Have you ever fixed something only to find it doesn’t work because of a loose connection? Double-checking this step can save you from such frustration.Securing The Screws
Next, secure the screws back in their original places. Using a magnetic screwdriver can be a lifesaver, preventing those tiny screws from vanishing into thin air. It’s a small investment that pays off big time in avoiding lost pieces.Reattaching The Bezel
Snap the bezel back into place. It should fit snugly around the screen without forcing it. If it’s not fitting, something may be misaligned. Pause and reassess rather than pushing it into place, which could cause damage.Powering Up
Once everything is reassembled, power up your laptop. Watch the screen light up and check for any irregularities. Does everything look as it should? If yes, then you’ve successfully completed the screen replacement!Testing Functionality
Finally, test the functionality of the laptop. Use it for a while to ensure the screen responds well to commands. Adjust brightness settings and ensure there are no dead pixels or unusual lines. Is the display performing as expected? If yes, you’ve done an excellent job! Reassembling a laptop may seem daunting, but taking it step-by-step makes it manageable. Have you learned something new about your device during this process? Share your experiences or tips with others embarking on the same journey.Testing The New Screen
After installing a new screen, testing it is crucial. Ensure everything works as it should. This step confirms the success of your installation. It also helps identify any issues early.
Power On The Laptop
First, reattach the battery and power cable. Press the power button. Observe the screen. Does it light up? A working screen shows the boot logo.
Check Display Quality
Observe the screen’s brightness and color accuracy. Compare it with the previous screen. Look for any flickering or dead pixels. These are small black dots that don’t change color.
Test Screen Resolution
Open the display settings. Ensure the resolution matches the screen’s native resolution. Adjust settings if needed. A clear display indicates correct resolution settings.
Inspect For Physical Damages
Examine the screen edges and corners. Look for cracks or loose fittings. Make sure the screen is securely attached. A well-fitted screen prevents future problems.
Test Touch Functionality (if Applicable)
If your laptop has a touch screen, check its responsiveness. Swipe and tap to see if it reacts. Ensure no dead zones exist. A responsive screen enhances user experience.
Run A Video Test
Play a high-definition video. Observe the playback. Check for lag or distortion. Smooth playback means the screen functions properly.
Check For Backlight Bleeding
Display a dark image on the screen. Look for light spots on the edges. Minimal backlight bleeding is acceptable. Excessive bleeding needs attention.
Verify Screen Orientation
Rotate the laptop if it has a flexible hinge. Ensure the display adjusts correctly. A functioning orientation feature adds convenience.
Troubleshooting Common Issues
Fixing a laptop screen can be simple with the right steps. First, gather necessary tools like a screwdriver. Carefully remove the damaged screen and replace it with a new one. Ensure all connections are secure before reassembling your laptop.
Replacing a laptop screen can be a daunting task, especially if you’re doing it for the first time. You might feel nervous about the screws, cables, and the fragile screen itself. But sometimes, the real challenge comes after you’ve replaced the screen and it doesn’t work as expected. Understanding common issues and knowing how to troubleshoot them can save you a lot of time and frustration.Loose Connections
After installing your new screen, you might find that it doesn’t light up. A loose connection is often the culprit. Check the cable connections between the screen and the motherboard. Are they securely fastened? A slight nudge can sometimes solve the problem. Make sure connectors are snug and aligned correctly.Compatibility Problems
Did you ensure your new screen is compatible with your laptop model? If you’re seeing distorted images or colors, this could be an issue. Double-check the screen’s model number against your laptop’s specifications. Sometimes a small mismatch can cause major display issues.Driver Issues
Is your laptop screen not functioning despite being perfectly installed? Perhaps the problem lies with the software. Check if your graphics drivers are up to date. Outdated drivers can cause screen malfunctions. Updating them is often a quick fix.Screen Flickering
A flickering screen can be incredibly annoying. It often points to a loose cable or a power supply issue. Examine the cables connecting your screen to ensure they’re not damaged or loose. Consider checking your laptop’s power settings to see if adjustments can stabilize the display.Backlight Problems
A dark screen with faint images might indicate backlight issues. This could be due to a faulty inverter or a backlight failure. If the screen was functioning before replacement, retracing your steps during installation might reveal the issue.Dead Pixels
No one wants to deal with dead pixels on a brand-new screen. If you notice small black spots, it might be a manufacturing defect. Sometimes gently massaging the screen can help, or you might need to contact the manufacturer for support. Understanding these common issues can make your screen replacement journey smoother. Have you ever faced any of these problems? If yes, how did you resolve them? Your insights could help others avoid similar pitfalls.Frequently Asked Questions
How Do I Safely Remove A Laptop Screen?
To safely remove a laptop screen, first power off the device and unplug it. Carefully detach the bezel using a plastic tool. Unscrew the screen from its mount, ensuring not to damage cables. This process requires patience and precision to avoid further damage.
What Tools Are Needed For Screen Replacement?
You’ll need a small screwdriver set, plastic pry tools, and possibly a suction cup. These tools help in removing screws and gently prying open the laptop case. Ensure you have the correct screen replacement beforehand to avoid any mismatches.
Can I Replace A Laptop Screen Myself?
Yes, you can replace a laptop screen yourself with the right tools and guidance. It’s important to follow detailed instructions and be cautious with delicate components. However, if you’re uncertain, seeking professional help might be the best option.
How Long Does Screen Replacement Take?
Screen replacement typically takes between 30 minutes to 2 hours. The duration depends on your experience and the laptop model. Some laptops have more complicated designs, requiring extra time for careful disassembly and reassembly.
Conclusion
Replacing a laptop screen can seem tough, but it’s doable. Follow the steps carefully. Make sure you have the right tools. Check the screen model before buying. Disconnect the power and remove the battery. Handle the new screen gently to avoid damage.
Secure it properly. If stuck, seek help from a professional. Always prioritize safety and patience during the process. With practice, this task becomes easier. Remember, taking your time can lead to better results. Your laptop will soon be good as new.
Enjoy your refreshed device and the satisfaction of a job well done!



