
Are you tired of the constant hassle of switching audio devices on your Windows 11 computer? Imagine streaming your favorite music or joining a crucial Zoom call, only to find out the audio is coming from the wrong device.
Frustrating, right? You’re not alone in this struggle. The good news is, setting your default audio device can be a quick fix to ensure seamless sound transitions. Whether you’re a tech novice or a seasoned user, simplifying this process can make your digital life much easier.
In this guide, you’ll discover how to effortlessly set your default audio device on Windows 11, ensuring your sound is always just right. Stay tuned to transform your audio experience from chaotic to controlled.
Credit: www.digitalcitizen.life
Accessing Sound Settings
Accessing sound settings in Windows 11 is simple. Setting the default audio device requires a few steps. This guide will walk you through it. Follow these steps to make your experience smoother.
Opening The Settings Menu
First, click the Start button at the bottom left of your screen. This opens the Start menu. Look for the gear icon labeled ‘Settings’. Click on it to open the Settings menu.
The Settings menu holds various options. It’s where you can change system preferences. Take a moment to familiarize yourself with its layout.
Navigating To System Sound
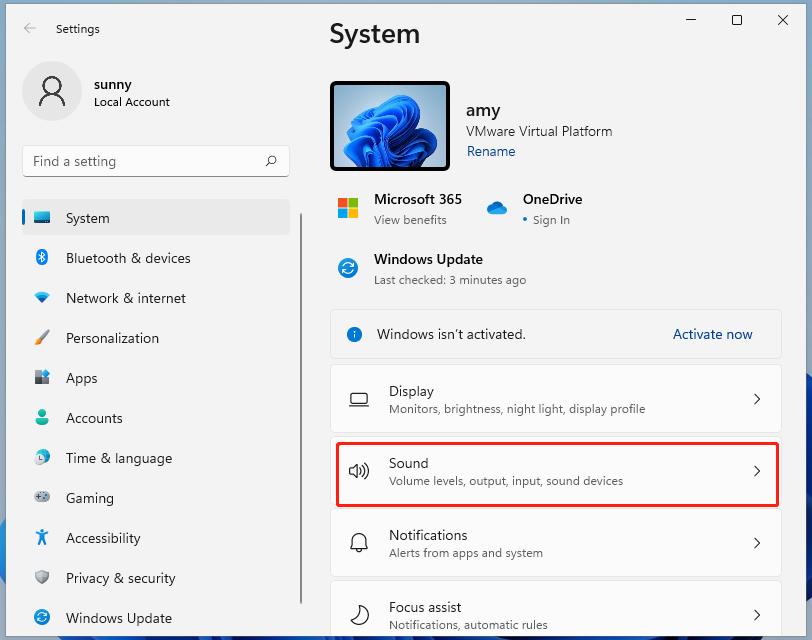
Once in Settings, locate the ‘System’ option. It’s usually at the top. Click on ‘System’. This opens a new set of options related to your device.
In the System menu, find ‘Sound’. Click on it. This section manages all sound-related settings. Here, you can choose your default audio device.
Explore the options available. Adjust settings as needed to enhance your audio experience.
Credit: www.partitionwizard.com
Choosing The Default Output Device
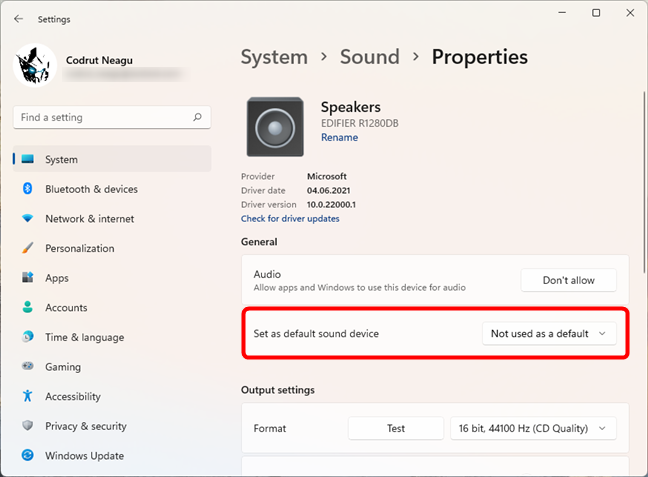
Setting your default audio device in Windows 11 is simple. Access sound settings through the Control Panel. Then, choose your preferred audio device for seamless sound output.
Choosing the Default Output Device on Windows 11 can enhance your audio experience. Setting the default device ensures smooth playback across applications. This is essential for clear sound during meetings or streaming videos. You can easily select the preferred output device without hassle. Follow these simple steps to make your audio setup perfect.Selecting Audio Output
Navigate to the Settings app on your Windows 11 system. Click on ‘System’ and then ‘Sound’. You’ll see a list of audio devices connected to your computer. Choose the device you want to set as the default. Click on it to select. This will direct sound through your chosen device. Make sure your selected device is connected properly. If wireless, ensure it is paired and ready.Confirming The Change
After selecting your default audio output, confirm the change. Play a video or song to test the audio device. Ensure the sound is coming from the selected device. If the sound is unclear, check the volume settings. Sometimes, restarting the application helps. Confirming ensures your settings are applied correctly. Adjust until you hear clear audio output. Enjoy a seamless audio experience with your chosen device.Configuring Default Input Device
Set your default audio device in Windows 11 easily through the sound settings. Access the settings menu and select your preferred input device. This ensures consistent audio performance for all applications.
Configuring the default input device in Windows 11 is essential. It ensures your audio input is set to your preferred device. Whether you’re using a microphone or headset, setting the default input improves communication. This guide will show you how to configure this with ease.Selecting Audio Input
First, click the ‘Start’ menu and open ‘Settings’. Then, go to ‘System’. Click on ‘Sound’ in the left pane. Under ‘Input’, you will see a list of devices. Choose your preferred audio input device. This ensures your selected device is the default.Verifying The Selection
After selecting, make sure the device works correctly. Speak into the microphone. Check if the sound meter moves. This confirms the device is active. If not, check the connections. Ensure the device is plugged in properly. Reboot your system if needed. This often fixes minor issues. Your input device should now be set up.Troubleshooting Common Issues
Setting the default audio device on Windows 11 should be straightforward, but sometimes things don’t go as planned. You might encounter a few hiccups that could leave you scratching your head. Whether your sound suddenly disappears, a device is missing from the list, or changes need to be undone, troubleshooting these common issues can save you a lot of time and frustration.
No Sound Output
You’ve set your default audio device, yet there’s no sound coming from your speakers. This can be annoying, especially if you’re in the middle of a movie or a video call. Check if your device is muted or the volume is turned down. Sometimes, the simplest solutions are the most effective.
Next, ensure your audio driver is up-to-date. An outdated driver can disrupt sound output. Head to the Device Manager and check for updates. If the problem persists, restarting your computer might just do the trick. Did you know that a simple reboot often resolves sound issues?
Device Not Listed
You can’t set a default device if it doesn’t appear in the list. This might happen if the device is disabled. Navigate to the sound settings and ensure that all devices are displayed. Right-click and select “Show Disabled Devices” to see if it appears.
If your device still isn’t listed, check the physical connections. A loose cable or disconnected Bluetooth device might be the culprit. Have you ever missed a cable connection only to find it solved the mystery?
Consider reinstalling your audio drivers if necessary. Sometimes, a fresh start with drivers can magically resolve the issue.
Reverting Changes
You might want to switch back to your previous audio settings, especially if the new setup doesn’t sound quite right. To revert changes, head back to the sound settings and select the previous device from the list.
If you’re unsure which device was set before, remember what worked best for your needs. Was it your headset or your speakers? Prioritize your preferences and functionality.
Keep in mind, reverting isn’t a failure—it’s a step towards finding what works best for you. Have you ever made a change only to realize the original was better suited?
Troubleshooting doesn’t have to be a daunting task. With a few practical steps, you can navigate through common issues and enjoy seamless audio experiences on Windows 11. What’s your go-to fix when sound issues arise?
Advanced Audio Settings
Windows 11 offers advanced audio settings to enhance your listening experience. These settings help you manage and optimize your audio devices. Understanding these features can improve sound quality and ensure seamless audio performance. Dive into the settings and unlock the full potential of your audio devices.
Managing Volume Levels
Adjusting volume levels is crucial for balanced sound. Access the volume mixer to set different levels for various applications. This ensures consistent audio output across all programs. Right-click the speaker icon in the taskbar. Select ‘Open Volume Mixer’ to begin. Here, you can tweak individual app volumes. This feature is useful for multitasking or gaming.
Enhancing Audio Quality
Audio quality impacts your listening experience. Windows 11 provides options to enhance it. Navigate to settings and select ‘Sound’. Here, you’ll find ‘Advanced Sound Options’. Enable features like spatial sound. This creates an immersive audio environment. Use equalizer settings to adjust bass and treble. Tailor the sound to your preference for a richer experience.
Credit: support.openrainbow.com
Frequently Asked Questions
How Do I Change Default Audio Device In Windows 11?
To change the default audio device in Windows 11, go to Settings > System > Sound. Click on ‘Choose where to play sound’ and select your desired device. This action sets it as the default audio device for your system.
Can I Set Multiple Default Audio Devices?
Windows 11 allows only one default audio device at a time. You can switch between devices using the Sound settings. This ensures clarity and proper audio routing for your applications.
What Happens If Default Audio Device Is Not Working?
If your default audio device isn’t working, check connections and drivers. Update or reinstall drivers via Device Manager. Also, ensure the correct device is selected in Sound settings to resolve the issue.
Why Can’t I Find My Audio Device In Windows 11?
Missing audio devices may be due to driver issues or hardware problems. Ensure your device is connected and drivers are updated. Reboot your PC and check Device Manager for any errors or missing devices.
Conclusion
Setting the default audio device in Windows 11 is simple. Just follow the steps and you’ll be done quickly. Choose the best audio device for your needs. This ensures the sound is clear and consistent. Troubleshooting sound issues becomes easier with the right default settings.
Regularly check your settings for optimal performance. Remember, sound settings can affect your computer experience. Adjust them to suit your environment. Enjoy better sound clarity with the right configuration. Stay informed about updates to improve your device settings. Keep your audio device running smoothly for the best results.



