
If you’re looking to boost your desktop computer’s performance without spending a fortune, installing new RAM might be the perfect solution. It’s a simple upgrade that can significantly enhance your system’s speed and efficiency.
Imagine your computer running smoother and faster, making your daily tasks easier and more enjoyable. You don’t need to be a tech wizard to pull this off. With a few easy steps, you can install RAM like a pro. Curious to know how you can transform your computer experience?
Stick around, and let’s walk through the process together. By the end of this guide, you’ll feel confident and ready to give your desktop the upgrade it deserves.

Credit: www.crucial.com
Preparation
Installing RAM in a desktop computer requires careful preparation. Start by turning off the computer and unplugging it. Open the case to locate the RAM slots, ensuring clean hands to avoid static damage.
Preparing to install RAM in your desktop computer is a crucial step that sets the stage for a smooth upgrade. Proper preparation ensures that you don’t run into unexpected issues during the installation. It’s all about checking compatibility and gathering the right tools before diving into the process. Let’s make sure you’re ready to go!Check Compatibility
Before purchasing RAM, make sure it’s compatible with your motherboard. This means checking the type of RAM your motherboard supports, such as DDR3, DDR4, or DDR5. Your motherboard’s manual or the manufacturer’s website can provide this information. Moreover, check the maximum RAM capacity your system can handle. Installing more than the maximum won’t provide additional benefits.Gather Tools
Having the right tools at hand can make the installation process much easier. You’ll need a screwdriver to open your computer case. Consider wearing an anti-static wristband to prevent static electricity from damaging your components. You might also want a flashlight to help you see inside your computer, especially in dimly lit areas. Do you have everything you need? Missing tools can turn a simple task into a frustrating experience. Now that you’re prepared, you’ll find the installation process much smoother. Remember, preparation is the key to success. By ensuring compatibility and gathering tools, you’re setting yourself up for a hassle-free upgrade.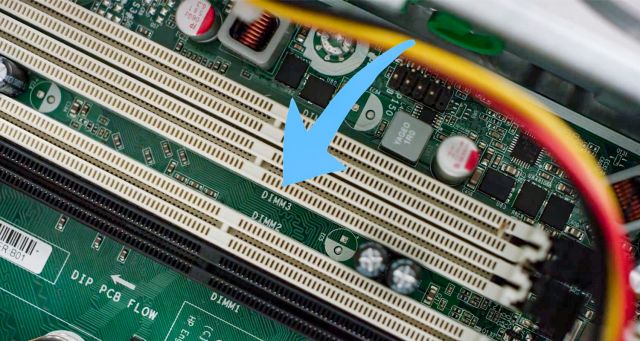
Credit: www.crucial.com
Power Down And Open Case
Ensure your computer is off before installation. Open the case carefully to access the RAM slots inside.
Upgrading your desktop computer’s RAM can significantly boost its performance, allowing you to run more applications smoothly and efficiently. Before diving into the installation process, the crucial first step is to power down and open the case. This ensures your safety and protects your computer’s sensitive components. Let’s walk through the necessary steps to safely prepare your computer for this upgrade.Shut Down Computer
The very first action is to properly shut down your computer. Simply pressing the power button is not enough. Use the Start menu to select the “Shut Down” option. This ensures that the operating system closes all programs and saves any ongoing processes. Ever had a computer error because you turned off the power too quickly? It’s a headache! Avoid this by shutting down through the menu.Unplug Power Cable
Once your computer is off, the next safety measure is unplugging the power cable. This step is crucial to prevent any electrical shock or damage to the internal components. Remember, even if the computer is off, it can still carry a residual charge. Have you ever unplugged your phone charger and felt a slight spark? Imagine that on a larger scale with your computer; better safe than sorry!Remove Side Panel
With the power disconnected, it’s time to remove the side panel of your computer case. Typically, this requires unscrewing a few screws or sliding a latch. Once removed, you’ll have access to the motherboard and RAM slots. If you’ve ever felt like a tech guru while peering into the guts of your computer, now is your chance! Just be gentle and careful not to touch any components directly. Opening your computer case might seem daunting, but it’s a straightforward process that sets the stage for a successful RAM installation. Are you ready to see what your computer is made of? Take a deep breath, follow these steps, and you’ll be on your way to enhancing your system’s speed and efficiency.Locate Ram Slots
Understanding how to locate RAM slots in your desktop is crucial. It ensures proper installation and optimal performance. This process involves identifying the layout of your motherboard and spotting existing RAM. Let’s delve into these steps for a smooth installation.
Identify Motherboard Layout
The motherboard is the main board inside your computer. It hosts all crucial components. To find RAM slots, you must first identify the motherboard layout. Open the computer case carefully. Look for a large, flat board with various components attached. The RAM slots are usually long and narrow.
Check the motherboard manual if available. It can provide a diagram of the layout. This helps you locate the slots easily. Motherboard layouts vary by model and manufacturer. Knowing your layout saves time and avoids mistakes.
Spot Existing Ram
Before adding new RAM, spot the existing RAM. This ensures compatibility and space for new sticks. RAM modules are usually rectangular with gold pins. They are seated in the slots perpendicular to the board. Check how many slots are occupied. This tells you how many slots are available for new RAM.
Gently press the clips on either side of the RAM stick. This releases them from the slot. Once removed, note the type and size of existing RAM. Matching these details with new RAM ensures smooth operation.
Remove Old Ram
Before installing new RAM, removing the old RAM is essential. This process ensures your desktop has the space needed for the upgrade. Removing RAM might seem tricky, but it’s straightforward with the right steps.
Release Clips
Most RAM slots have clips at both ends. These clips hold the RAM securely in place. Begin by gently pressing down on the clips. This action releases the RAM stick from the slot. Listen for a slight click when the clips disengage. Be careful not to apply excessive force as it may damage the motherboard.
Carefully Eject Ram
Once the clips are released, the RAM stick will loosen. Grip the RAM stick at both ends. Pull it out gently and steadily. Avoid touching the gold connectors. Touching them can affect the performance of the RAM. Place the old RAM in a safe, static-free bag. This prevents damage if you plan to reuse it.
Install New Ram
Learn to install RAM in your desktop computer with ease. Open the case and locate the RAM slots. Insert the new RAM module firmly into the slot until it clicks. Close the case and turn on your computer to enjoy improved performance.
Installing new RAM in your desktop computer can significantly boost its performance. It’s a straightforward process that even beginners can tackle. If you’re ready to give your PC a little more oomph, let’s dive into the practical steps.Align With Slot
Before you get started, ensure your computer is powered off and unplugged. Open the case to access the motherboard. You’ll notice long slots where the RAM fits, often positioned near the CPU. Look closely at the RAM stick. You’ll see a small notch that needs to align perfectly with the ridge in the slot. This notch ensures the RAM can only be inserted in one direction. It might seem like a minor detail, but aligning it correctly is crucial. Imagine you’re putting a puzzle piece into place—force is unnecessary if it’s aligned right.Press Firmly
Once you’ve aligned the RAM, it’s time to press it into the slot. Use even pressure with your thumbs on both ends of the stick. You’ll hear a satisfying click when it’s securely seated. Don’t be afraid to use a bit of force, but avoid being too rough. If you’re hesitant, remember when you pressed the enter key a little too hard during a heated gaming moment. It’s somewhat like that, just with a bit more finesse. After pressing, check that the RAM is level. If it’s tilted, it might not be fully inserted. A quick press on each end should confirm it’s snug. Installing RAM is simple, but paying attention to these details can save you from potential headaches later. Are you ready to enjoy a faster and more responsive computer?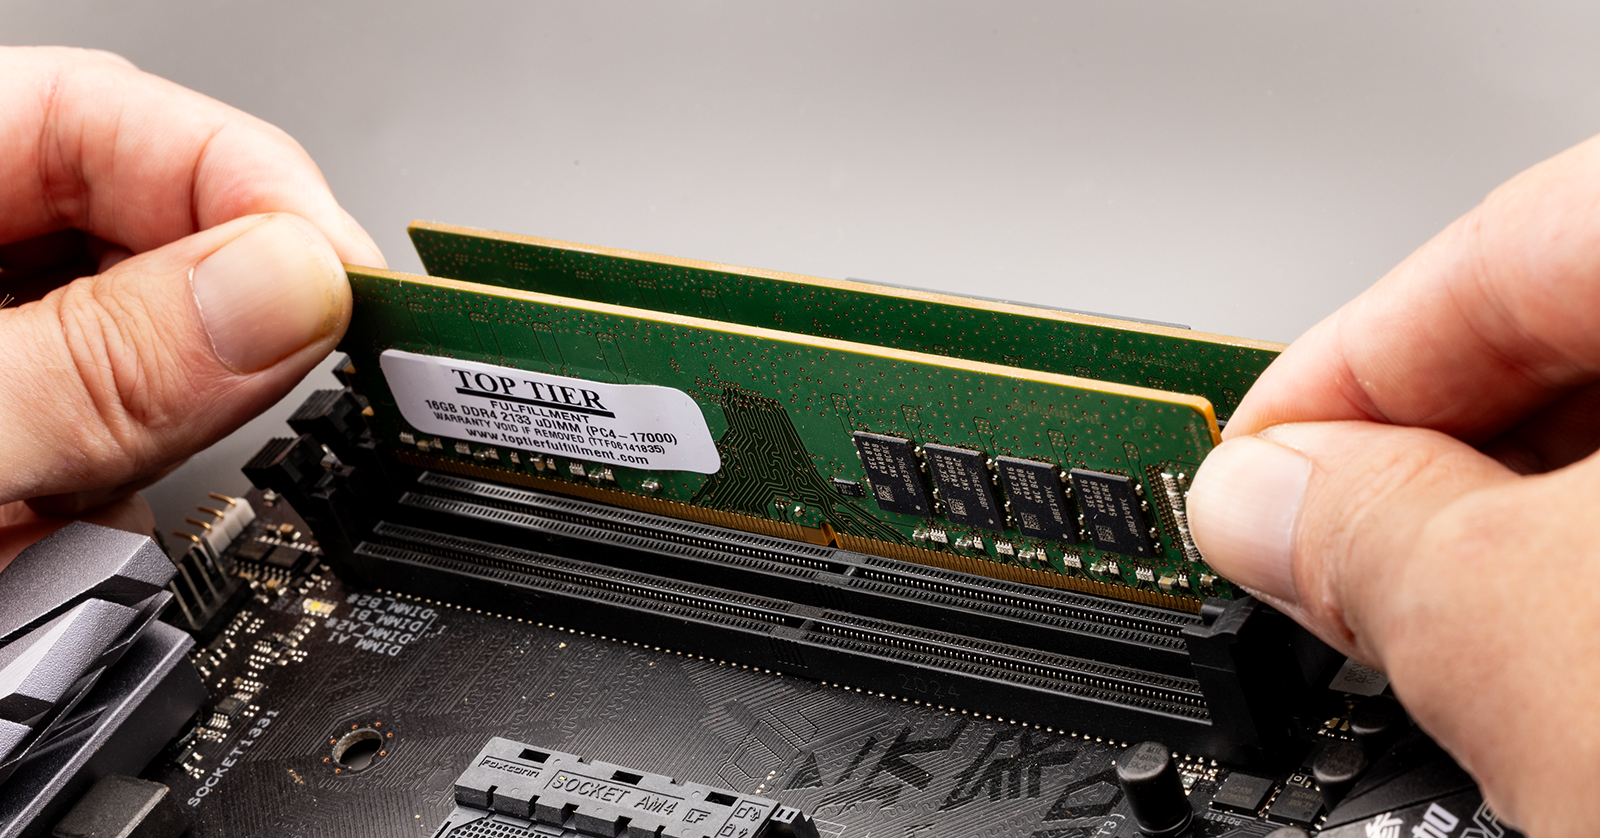
Credit: www.sweetwater.com
Secure Ram In Place
Installing RAM in a desktop computer is a straightforward process. It’s crucial to secure the RAM properly. A loose RAM can cause system instability. Follow these steps to ensure your RAM is locked in place and stable.
Lock Clips
First, locate the RAM slots on your motherboard. Each slot has a clip on both ends. These clips lock the RAM in place. Ensure they are open before inserting the RAM. Carefully align the RAM module with the slot. Press down firmly until the clips snap back into place. This ensures your RAM is secure.
Ensure Stability
Once the RAM is locked, check for stability. Gently wiggle the RAM module. It should not move. If it does, recheck the clips. They might not be fully engaged. A stable RAM ensures better computer performance. Double-check your work. Stability is key.
Reassemble Computer
Installing RAM in a desktop computer involves opening the case and locating the RAM slots. Gently align the RAM stick with the slot and press down until it clicks into place. Ensure it’s securely seated for optimal performance.
Reassembling your desktop after installing RAM is just as crucial as the installation itself. It’s the step where your computer transforms from scattered parts back into a functioning machine. You might feel a bit like a surgeon stitching up after a successful procedure. But don’t worry, if you’ve come this far, you’re more than capable of completing the reassembly.Replace Side Panel
Start by placing the side panel back onto your computer case. Align it carefully with the grooves. It’s a bit like fitting a puzzle piece; you’ll know when it’s right because it’ll sit flush with the rest of the case. Secure it with the screws you removed earlier. This ensures your computer’s interior is protected from dust and other elements. Think of it as putting the lid back on a treasure chest. Have you ever wondered why these panels are so vital? They not only protect but also help maintain optimal airflow within the case.Reconnect Power
Once the side panel is snugly fitted, it’s time to reconnect the power. Locate the power cable you disconnected earlier and plug it back into the power supply unit. Ensure the connection is firm. Imagine plugging in a charger to your phone; it’s a simple but essential step that breathes life into your device. Do you recall the thrill of seeing your computer light up for the first time? That’s the moment you’re recreating. After reconnecting, double-check that all peripherals like monitors, keyboards, and mice are also plugged back in. This way, you’re prepared for a seamless start-up. Consider how every small step leads to the grand finale—your computer coming back to life, ready to take on your tasks.Test Installation
Installing RAM in a desktop computer is a straightforward task. First, ensure the computer is powered off and unplugged. Open the case, locate the RAM slots, and gently insert the RAM sticks until they click into place.
Testing the installation of RAM in your desktop computer is a crucial step to ensure everything is working correctly. After all, nobody wants to be greeted with a black screen or unexpected error messages. This stage will help you confirm that your new RAM is recognized and functioning properly. It’s time to power up and see the fruits of your labor.Boot Computer
Press the power button and keep an eye on your monitor. The boot-up process should begin, displaying the usual startup screens. If your computer doesn’t turn on or there’s a continuous beep sound, don’t panic. This often indicates that the RAM might not be seated properly. Turn off the computer and ensure the RAM is firmly in place. Once you’ve ensured everything is secure, try booting again. A smooth startup means you’re off to a great start!Verify Ram Recognition
After your computer boots up, it’s time to check if it recognizes the new RAM. Navigate to your system settings. On Windows, right-click on ‘This PC’ and select ‘Properties’. Here, you’ll see a section that shows the installed RAM. Does the number match your expectations? If you’re using a Mac, click on the Apple icon, then ‘About This Mac’. Here, you should find information about your total memory. It’s a satisfying moment to see your computer acknowledging the new upgrade. If the numbers don’t add up, double-check the installation or consult your motherboard manual for compatibility issues. Have you ever wondered why some RAM sticks just won’t work even if they’re brand new? Sometimes, it’s about the compatibility with your motherboard. Always double-check before buying, and if needed, reach out to the retailer for assistance. By carefully following these steps, you’re not just installing RAM—you’re learning to troubleshoot and enhance your desktop’s performance. Remember, every successful upgrade brings you closer to mastering your tech setup.Troubleshooting Tips
Installing RAM in your desktop computer can be a straightforward task, but sometimes, things don’t go as planned. If your computer doesn’t recognize the new RAM or you encounter performance issues, don’t worry. Here are some troubleshooting tips that might help you resolve the problem and get your system running smoothly.
Check Connections
First, ensure the RAM modules are seated properly in their slots. Sometimes, they may seem secure but aren’t fully connected. Try removing the RAM and reinserting it firmly. Listen for a click that indicates it’s locked in place. You might also want to check if any dust or debris is obstructing the connection.
Update Bios
Outdated BIOS can sometimes cause compatibility issues with new RAM. Updating your BIOS is a potential solution. Visit your motherboard manufacturer’s website and look for BIOS updates. Follow their instructions to install the latest version. This update might make your system more receptive to the new hardware.
Consult Manufacturer Support
If you’re still facing issues, reaching out to the RAM or motherboard manufacturer’s support can be a wise step. They often have valuable insights into compatibility issues and can offer specific guidance. Their support teams can help you determine if the RAM is defective or if there’s another underlying issue.
Have you ever spent hours trying to fix a simple problem, only to find out a quick call to support could have saved you time? It’s easy to overlook manufacturer support, but it can be a game-changer in solving technical hiccups.
When troubleshooting RAM installation issues, patience and methodical checking are key. What’s the most unexpected solution you’ve discovered while fixing a tech problem? Feel free to share in the comments below!
Frequently Asked Questions
How Do I Know If My Desktop Needs More Ram?
If your computer is slow or struggles with multiple tasks, it may need more RAM. Check the Task Manager or Activity Monitor to see RAM usage. If usage is consistently high, upgrading RAM can improve performance and speed.
What Type Of Ram Does My Desktop Use?
To find out, check your computer’s manual or manufacturer’s website for specifications. Alternatively, use online tools like Crucial’s System Scanner. Make sure to match the RAM type, speed, and size to your system’s requirements for compatibility.
Is Installing Ram In A Desktop Difficult?
Installing RAM in a desktop is relatively easy. Ensure your computer is turned off and unplugged. Open the case, locate the RAM slots, and insert the new RAM sticks. Press down firmly until they click into place. Close the case and restart your computer.
Can I Mix Different Ram Brands And Sizes?
Mixing RAM brands and sizes is possible but not recommended. It can lead to compatibility issues and instability. For optimal performance, use matching RAM sticks in terms of brand, size, and speed. Always consult your motherboard’s manual for compatibility guidelines.
Conclusion
Installing RAM in a desktop is easy and improves performance. Follow the steps carefully to avoid mistakes. Handle the RAM modules gently to prevent damage. Ensure the RAM is compatible with your system. Check your computer’s manual for guidance. Proper installation enhances speed and efficiency.
Enjoy smoother multitasking and faster programs. Regularly upgrade RAM to keep your computer running well. A little effort leads to a big difference. With new RAM, your desktop feels refreshed. Now, your computer can handle more tasks effortlessly. Happy computing!