

You’re sitting at your desk, working on an important project or maybe browsing through some interesting content, when suddenly you find something you want to save or share. Ever wondered how to capture exactly what you see on your desktop screen?
Knowing how to take a screenshot on your desktop computer is a skill you’ll find incredibly useful. Whether you’re saving important information, sharing a funny moment, or capturing an error message for tech support, mastering this simple trick can make your digital life much easier.
Imagine being able to quickly save and share anything on your screen with just a few clicks. Sounds great, right? This guide will show you exactly how to do it. We’ll break down the process into easy steps, tailored for both Windows and Mac users. Don’t worry if you’re not tech-savvy; this is simple enough for anyone to follow. Keep reading, and soon you’ll be taking screenshots like a pro!
Choosing The Right Tool
Selecting the perfect tool is crucial for taking screenshots on a desktop computer. Consider options like the Snipping Tool for simplicity, or Snagit for advanced features. Each tool offers unique benefits, making it easy to capture, edit, and share images efficiently.
Capturing screenshots on your desktop computer might seem straightforward, but the variety of tools available can make it a bit overwhelming to choose the right one. Each tool comes with unique features designed to meet different needs, whether you’re a casual user or someone who needs advanced functionalities. By understanding these options, you can select the best tool that enhances your workflow and productivity.Built-in Options
Built-in tools are often the easiest way to take screenshots. They are pre-installed and ready to use without any additional downloads. On a Windows PC, the Snipping Tool and the Print Screen key are popular choices. The Snipping Tool lets you capture free-form, rectangular, or full-screen snips with ease. Have you tried using the new Snip & Sketch feature? It offers more flexibility and is perfect for annotating screenshots directly. On a Mac, Command + Shift + 4 is a handy shortcut. It allows you to capture a selected portion of your screen. If you hold the spacebar, you can even move the selected area around, which is quite convenient. Think about how often you’ve needed a quick screenshot without the fuss of additional software. Built-in tools keep it simple and efficient.Third-party Software
Sometimes, built-in tools just don’t cut it, especially if you need advanced features. Third-party software can offer enhanced capabilities like editing, cloud storage, and sharing options. Lightshot is a popular choice for its simplicity and speed. It lets you quickly select an area and share or save it in various formats. Greenshot is another excellent option, offering rich features like image editing and direct upload to online platforms. When was the last time you needed to annotate a screenshot for a presentation or report? These tools can save you time and effort, providing functionalities that built-in tools might lack. Choosing between built-in options and third-party software largely depends on your needs and preferences. Do you want a quick, no-frills solution, or do you need more robust features for professional use? Understanding what each tool offers can help you make an informed decision, ensuring that your screenshot experience is as seamless as possible.
Credit: www.webwise.ie
Screenshot On Windows
Capturing a screenshot on a Windows desktop is a simple task. It allows you to save or share information quickly. Whether you need to capture an error message or share a game moment, Windows offers several tools. Each tool has unique features to suit different needs.
Using Print Screen Key
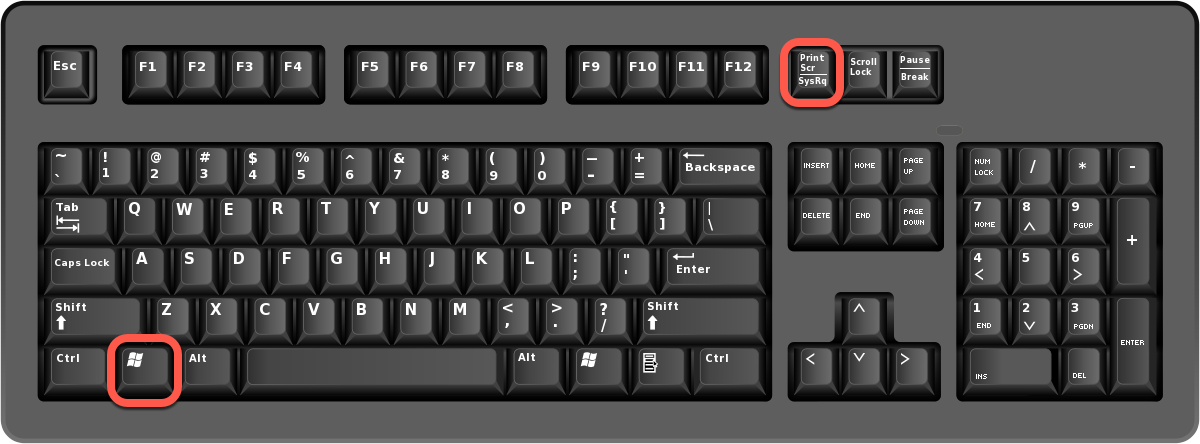
The Print Screen key is a fast way to capture your screen. You can find it on the top row of your keyboard. Pressing this key copies the screen image to the clipboard. Open an image editor like Paint to paste and save it. For capturing only the active window, use Alt + Print Screen keys together. This method is quick and effective for most users.
Snipping Tool Basics
The Snipping Tool provides more options than the Print Screen key. Search for it in the Start menu to open it. Use this tool to capture different types of screenshots. You can select free-form, rectangular, window, or full-screen snips. After capturing, you can annotate and save the snip. The Snipping Tool is perfect for users who need precision.
Snip & Sketch Features
Snip & Sketch is the upgraded version of the Snipping Tool. It offers enhanced editing capabilities. Open it from the Start menu or by pressing Windows + Shift + S keys. This tool lets you capture part or all of your screen. Edit your screenshot with various tools like pen, highlighter, and ruler. You can also share your snip directly. Snip & Sketch is ideal for detailed work.
Screenshot On Mac
Capturing a screenshot on a Mac desktop is simple. Press Command + Shift + 3 for the entire screen. For a selected portion, use Command + Shift + 4. This saves the image on your desktop, making it easy to find and use.
Capturing a screenshot on a Mac is straightforward and efficient. Whether you need to record a specific window or the entire screen, Mac offers versatile options. Screenshots can be saved directly to your desktop or clipboard. Let’s explore different methods to capture screenshots on a Mac.Using Keyboard Shortcuts
Keyboard shortcuts provide a quick way to take screenshots. Press Command + Shift + 3 to capture the entire screen. To capture a selected area, press Command + Shift + 4. Your cursor will change to a crosshair. Drag it to select the area you want to capture. For capturing a specific window, press Command + Shift + 4, then Spacebar. Click on the window you wish to capture. Screenshots are automatically saved as .png files on your desktop.Preview App For Screenshots
The Preview app offers another method for taking screenshots. Open the Preview app from your Applications folder. Go to File, then select Take Screenshot. You can choose from three options: From Selection, From Window, or From Entire Screen. After capturing, you can edit and save the screenshot within the app. This method is ideal for those who prefer a graphical interface over keyboard shortcuts.
Credit: www.youtube.com
Editing Your Screenshot
Once you capture a screenshot, editing can enhance its clarity and appeal. Simple edits can highlight important details. Advanced techniques can transform your screenshot into a polished image. Let’s explore the tools and methods for editing your screenshots.
Basic Editing Tools
Basic tools help you crop, resize, and annotate screenshots. Most operating systems come with built-in editing tools. Use these to make quick adjustments. Cropping removes unwanted areas. Resizing adjusts the dimensions. Annotations like arrows or text boxes can emphasize key points. These simple edits can make your screenshots more effective.
Advanced Editing Techniques
Advanced editing offers more options to refine your screenshots. Software like Photoshop or GIMP provides extensive features. Adjust the brightness and contrast for better visibility. Use layers to add complex elements. Filters can change the mood or style. Advanced techniques require practice but offer great flexibility. They allow you to create professional-looking images.
Saving And Sharing
Capturing a screenshot is just the beginning. Saving and sharing your screenshot effectively can enhance productivity. Screenshots can be saved in various formats, stored in the cloud, and easily shared with others. This section will guide you through these processes.
File Formats Explained
Screenshots can be saved in different file formats. The most common formats are PNG, JPEG, and BMP. PNG is ideal for high-quality images without losing detail. JPEG is suitable for smaller file sizes but might lose some quality. BMP files are large and uncompressed, often used for detailed editing. Choose a format based on your needs.
Cloud Storage Options
Storing screenshots in the cloud offers flexibility. Popular cloud services include Google Drive, Dropbox, and OneDrive. These platforms provide easy access from any device. You can organize your screenshots into folders and share them with others. Cloud storage ensures your screenshots are safe and accessible anytime.
Credit: www.bitdefender.com
Troubleshooting Common Issues
Capturing screenshots on desktop computers can be tricky. Press the “Print Screen” key for a full screen capture. For specific windows, use “Alt + Print Screen” to focus on the active window only.
Capturing screenshots on a desktop computer can be a breeze, but sometimes, you might encounter a few hiccups along the way. Troubleshooting common issues is crucial to ensure that your screenshot process runs smoothly. Whether you’re facing keyboard shortcuts that refuse to cooperate or software that just won’t play nice, understanding these obstacles will empower you to solve them effectively.Keyboard Shortcuts Not Working
Have you ever pressed the Print Screen button, only to find nothing happens? This can be frustrating. Sometimes, the problem lies in a simple oversight: your keyboard might not be properly connected or activated. Check the connection and ensure your keyboard drivers are up-to-date. Another common issue is conflicting shortcuts. If you’ve installed new software, it might override the default screenshot shortcuts. To tackle this, customize your shortcuts in the settings menu of your operating system. This way, you regain control and ensure your favorite screenshot keys work as intended.Software Compatibility Problems
Imagine downloading a new screenshot tool, only to find it doesn’t work with your system. Compatibility issues are common, especially with older operating systems. Always check the software requirements before installing. This saves you time and effort. In some cases, the installed software might not be compatible with other applications running on your computer. Consider disabling unnecessary programs when capturing a screenshot. This minimizes interference and ensures smooth operation of your chosen screenshot tool. Have you ever faced these issues? How did you overcome them? Sharing your experiences might just help others in the same predicament. Remember, troubleshooting is about being proactive. With the right approach, you can overcome any challenge and ensure your screenshot process is seamless.Frequently Asked Questions
How Do I Take A Screenshot On Windows?
Press the “Print Screen” key to capture the entire screen. Alternatively, use “Windows + Shift + S” for the Snipping Tool. The screenshot will be copied to your clipboard. You can then paste it into an image editor or document.
What Is The Shortcut For Mac Screenshots?
Use “Command + Shift + 3” to capture the entire screen. For a selected portion, press “Command + Shift + 4”. The screenshot will be saved to your desktop automatically. These shortcuts provide quick and easy access to screenshot features.
Can I Edit Screenshots After Taking Them?
Yes, you can edit screenshots using various tools. On Windows, use Paint or third-party apps like Snagit. On Mac, use Preview or any image editor. These tools allow you to crop, annotate, and enhance your screenshots efficiently.
Where Are Screenshots Saved On My Computer?
On Windows, screenshots are usually saved in the “Screenshots” folder within “Pictures”. On Mac, they are saved directly to your desktop. You can change the default save location using settings or preferences in your operating system.
Conclusion
Screenshots capture important moments on your computer screen. Easy steps make it simple. Use keyboard shortcuts or built-in tools. Quick and efficient. No need for extra software. Practice makes perfect. Try different methods to find your favorite. Screenshots help with sharing information.
Great for tutorials or troubleshooting. Remember to save your screenshots. Organize them well for easy access. Share them with friends or colleagues. Enhance your digital communication. Screenshots are a handy tool for everyday tasks. Keep learning and exploring. Capture, save, and share with ease.