
Are you ready to unlock the full potential of your digital camera and capture stunning photos that wow your friends and family? Imagine having the ability to adjust your camera settings so precisely that every image becomes a masterpiece.
Whether you’re a beginner or have been snapping away for years, understanding the best settings for your digital camera can transform your photography skills. You’ll discover how to bring vibrant colors to life, capture crystal-clear details, and create breathtaking compositions.
Dive into this article, and you’ll gain the confidence to take control of your camera, ensuring every shot reflects your vision perfectly. Get ready to elevate your photography game and make every click count!
Camera Modes
Exploring camera modes unlocks optimal settings for stunning photos. Adjust aperture, shutter speed, and ISO for perfect exposure. Experiment with manual, portrait, and landscape modes to capture diverse scenes.
Capturing stunning photos with your digital camera often boils down to understanding its various camera modes. These modes are designed to help you control your camera settings easily and efficiently. Each mode serves a unique purpose, allowing you to tailor your photography based on different situations and creative goals.Manual Mode
In manual mode, you have complete control over your camera settings. This means you adjust the aperture, shutter speed, and ISO manually. It’s like having the reins of a horse; you decide the direction. Have you ever struggled with achieving the perfect exposure? Manual mode can be your best friend. It allows you to experiment and learn what settings work best in different lighting conditions.Aperture Priority
Aperture priority is perfect for when you want control over depth of field. You set the aperture, and the camera selects the appropriate shutter speed. This mode is fantastic for portraits and landscapes. Consider a time when you wanted that dreamy background blur. Aperture priority lets you achieve that bokeh effect effortlessly. It’s ideal for focusing on your subject while softening the background.Shutter Priority
Shutter priority mode is excellent for capturing motion. You choose the shutter speed, and the camera adjusts the aperture. It’s essential for action shots or when you want to freeze motion. Imagine capturing a waterfall with crisp clarity or a sports event in action. Shutter priority ensures you get that sharpness or motion blur exactly as you envision. Are you ready to catch those fast-paced moments with precision? Understanding these camera modes enhances your creative flexibility. What do you want your photos to say? The right mode can help you express it clearly.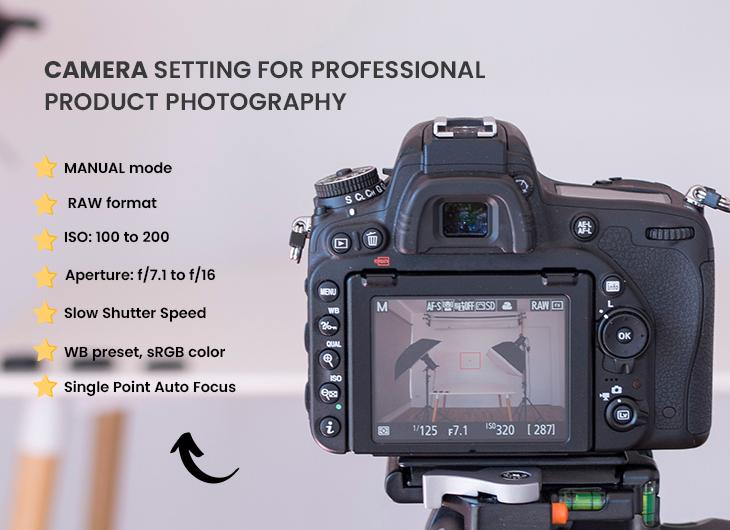
Credit: www.colorclipping.com
Iso Settings
Selecting the right ISO settings enhances photo quality. Low ISO is great for bright conditions. High ISO helps in low light but may add noise. Adjust ISO based on lighting for best results.
When you’re stepping into the world of digital photography, understanding ISO settings can be a game-changer. ISO is your camera’s sensitivity to light. Adjusting it correctly can make the difference between a perfect shot and a missed opportunity. Knowing how to tweak the ISO settings can elevate your photos, whether you’re capturing a sunset or a night sky.Understanding Iso
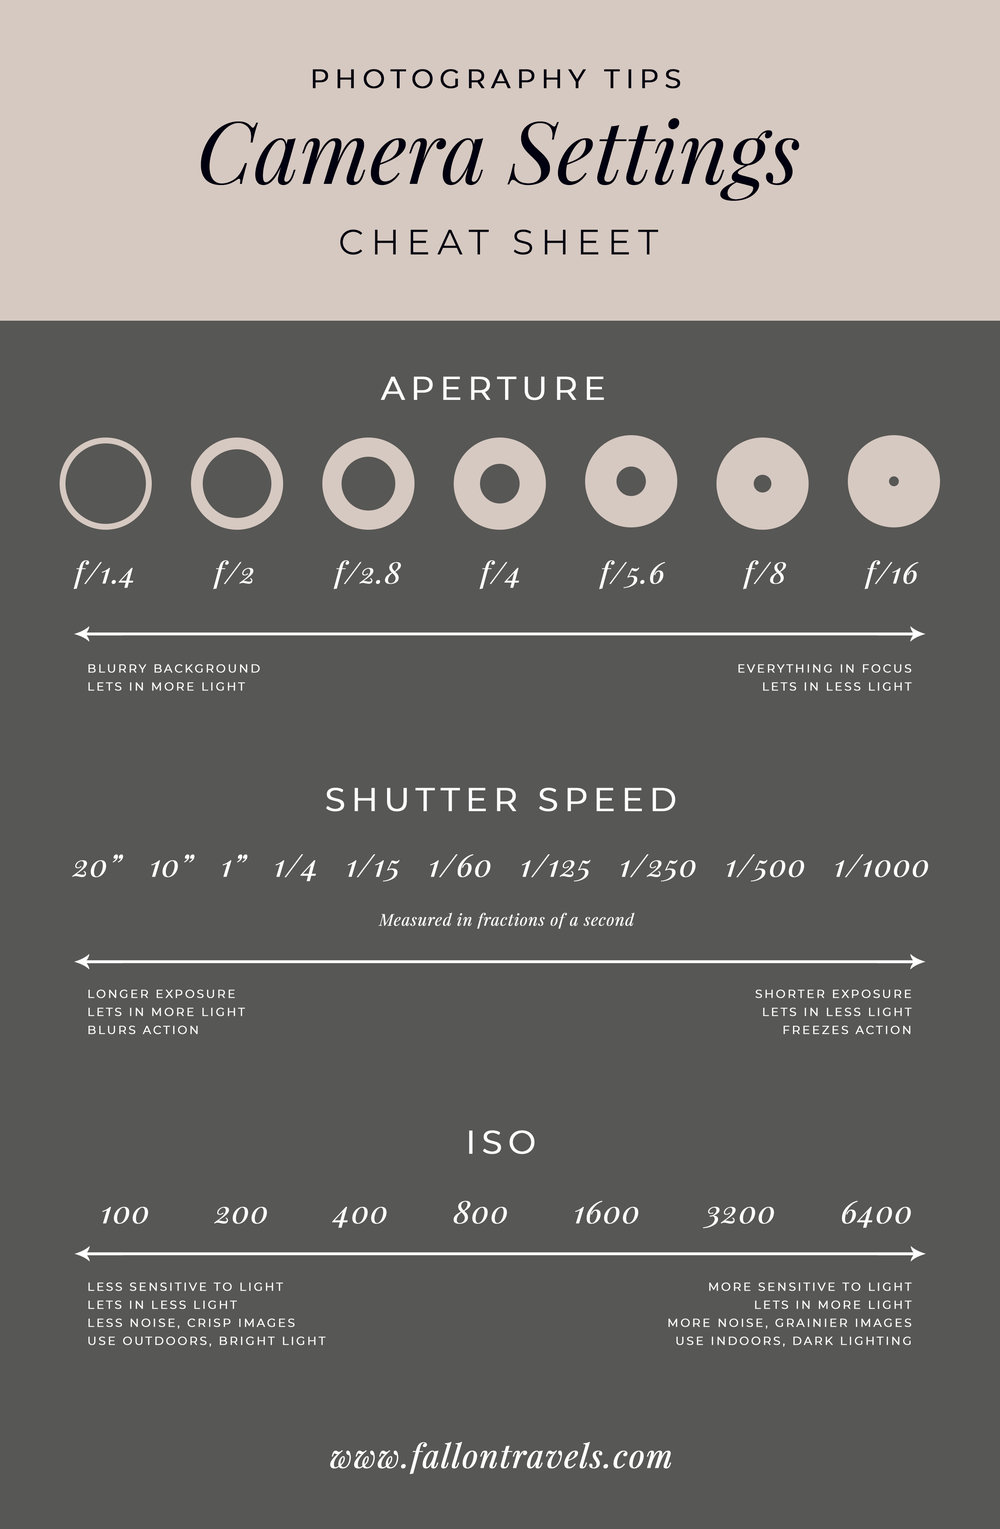
ISO stands for International Standards Organization, but in photography, it refers to your camera’s sensitivity to light. A lower ISO means less sensitivity, ideal for bright conditions. A higher ISO increases sensitivity, perfect for low-light situations. Consider a time you photographed a night scene. You might have noticed noise or graininess in your images. This often occurs because of high ISO settings. Balancing ISO with aperture and shutter speed helps you control exposure and clarity.Choosing The Right Iso
Selecting the right ISO setting is crucial. Start with the lowest ISO your camera offers, usually ISO 100. It’s perfect for sunny days or when you have plenty of light. If you’re shooting indoors or in low-light, increase the ISO. However, be cautious—higher ISO can lead to noise. When I first started, I mistakenly used high ISO during bright afternoons. My photos came out too bright and washed out. Learn from my mistake: match your ISO to the lighting conditions. Think about what you’re shooting. Is it a fast-moving subject or a still landscape? The right ISO can help freeze action or capture detail. Are you finding your photos too grainy? Dial down the ISO and adjust other settings like aperture or shutter speed to compensate. What ISO settings have you tried, and how did they impact your photos? Experiment with different settings and observe the changes. This hands-on approach will deepen your understanding and improve your skills.Aperture Control
Aperture control is a crucial aspect of digital photography. It affects how much light enters the camera. This setting influences the depth of field and exposure. Understanding aperture helps capture stunning photos.
Depth Of Field
Aperture plays a key role in depth of field. A wide aperture creates a shallow depth. This blurs the background, highlighting the subject. A narrow aperture increases depth. This keeps everything in focus, from foreground to background.
Depth of field impacts photo composition. Choose the aperture based on your creative vision. Portraits often use a wide aperture. Landscape photos benefit from a narrow aperture.
Adjusting For Light
Light adjustment is essential for good exposure. Aperture settings control light entry. A wider aperture lets more light in. This is useful in dim conditions. A narrower aperture reduces light. It’s ideal for bright environments.
Balancing light ensures well-exposed photos. Aperture adjustments work with ISO and shutter speed. These settings together create the perfect exposure. Experiment to find the best combination.
Shutter Speed Tips
Understanding shutter speed is key to better photos. It controls how long the camera’s shutter stays open. This affects the light entering and the motion captured. Getting it right can make your photos stunning. Let’s dive into some essential tips for perfecting your shutter speed settings.
Capturing Motion
Want to capture motion? Use a slow shutter speed. This technique shows movement as blur. It’s great for waterfalls or racing cars. Set your speed to 1/30 or slower. Use a tripod for stability. This keeps the rest of the image sharp. Experiment with different speeds. See how motion affects your shots.
Avoiding Blurry Images
Blurry images? Try a faster shutter speed. It freezes motion instantly. Ideal for sports or wildlife photography. Use 1/500 or faster settings. Ensure enough light for a good exposure. Adjust ISO or aperture if needed. Practice with moving subjects. Learn to adjust quickly for sharp results.
White Balance Adjustments
White balance adjustments are crucial for capturing the true essence of any scene with your digital camera. The right settings can make your photos look vibrant and natural, while incorrect adjustments might leave them looking dull or washed out. White balance is all about managing the color temperature in your images, ensuring that whites appear white, and colors appear as you see them in real life. Have you ever taken a picture indoors and noticed a strange yellow or blue tint? That’s a sign that your white balance needs tweaking.
Custom White Balance
Custom white balance allows you to tailor the color settings to the specific lighting conditions you’re shooting in. Imagine you’re at a friend’s wedding indoors, where the lighting is a mix of dim ambient lights and bright overhead bulbs. Your camera’s auto settings might struggle here, but setting a custom white balance can save the day.
To set it, you generally need to photograph a white or neutral gray surface under the same lighting. Your camera uses this reference to adjust colors accurately. It’s like giving your camera a cheat sheet for perfect color reproduction. Have you tried it during a sunset? It can capture the warmth without the unwanted blue cast.
Presets And Their Uses
Most digital cameras come with a variety of white balance presets to simplify your shooting experience. These presets are tailored for common lighting situations like daylight, cloudy, tungsten, and fluorescent. Using these can be a quick fix when you’re in a hurry or unsure about custom settings.
For example, the ‘Cloudy’ preset can be a game changer during an overcast day, adding warmth to the scene. The ‘Tungsten’ preset, on the other hand, is perfect for indoor settings with incandescent lighting, removing that orange hue. Have you ever thought about how each preset can be a creative tool rather than just a technical setting?
When choosing presets, consider experimenting to see how they affect your image’s mood. You might discover a preset that surprisingly enhances your picture’s vibrancy or mood, making it more compelling.
Next time you find yourself in challenging lighting, ask yourself: Are your camera’s white balance settings working for you or against you? Understanding and adjusting these settings can transform your photography experience from frustrating to fun.
Focus Techniques
Capturing stunning photos requires mastering focus techniques. These techniques help ensure your subject is sharp and your background complements the scene. Understanding focus settings can enhance the quality of your images.
Auto Focus Vs. Manual Focus
Auto Focus lets the camera do the work. It quickly adjusts to keep subjects sharp. Useful for moving objects or quick shots. Cameras today have advanced auto focus capabilities. They recognize faces and track motion effectively.
Manual Focus gives you control. You decide what’s sharp in the frame. Essential for artistic shots or low-light settings. It allows precise focusing on specific areas. Great for portraits or still life photography.
Focus Points
Focus points are areas where the camera focuses. Most cameras have multiple focus points. You can select one or let the camera choose. This helps in composing your image.
Using multiple focus points, you can cover more of your scene. It ensures the subject is sharp, even if it’s off-center. Single point focus allows precise control. Perfect for emphasizing a specific detail.
Understanding focus points improves your photo composition. It gives flexibility in how you frame your shot. Experiment with different settings for best results.
Metering Modes
Understanding metering modes in digital cameras is crucial for perfect exposure. These modes help the camera measure light and adjust settings automatically. Different modes offer varied benefits for different shooting scenarios. Knowing how to use them can elevate your photography.
Evaluative Metering
Evaluative metering is the default mode in most cameras. It assesses light across the entire scene. The camera divides the frame into zones and evaluates each one. It then creates an average exposure setting. This mode is ideal for general photography. It performs well in balanced lighting conditions. Beginners often find this mode easy to use.
Spot Metering
Spot metering focuses on a small part of the frame. It measures light from a tiny area, usually around 1-5% of the scene. This mode is useful for high-contrast scenes. It allows precise exposure control. Photographers use it to highlight specific details in complex lighting. It requires more skill, but offers great control over exposure.
Credit: fallontravels.com
Image Stabilization
Image stabilization plays a crucial role in photography. It helps reduce blur caused by camera movement. This ensures sharp and clear images. Whether capturing fast-moving subjects or using long zooms, stabilization is key. Knowing the best settings can greatly improve your shots.
In-camera Stabilization
Many digital cameras offer in-camera stabilization. This feature compensates for small movements. It adjusts the sensor to counteract shakes. Activating this feature is often simple. Check your camera’s menu for options. Different modes suit various shooting conditions. For handheld shots, choose the standard mode. For panning, use a dynamic mode if available. Experiment to find the best setting for your needs.
Using Tripods
Tripods offer the best stability for your camera. They provide a steady base for shooting. Ideal for low-light conditions. Long exposures benefit greatly from tripod use. Set up your tripod on a stable surface. Adjust the legs to ensure balance. Use a remote shutter release to avoid touching the camera. This further reduces any chance of movement. Disable image stabilization when using a tripod. It can cause unwanted motion.
Jpeg Vs. Raw Formats
Choosing between JPEG and RAW formats affects your digital camera’s settings. JPEG files are compressed and ready to share. RAW files offer greater editing flexibility, capturing more detail for professional results.
When you dive into digital photography, one of the first choices you’ll encounter is whether to shoot in JPEG or RAW format. Both formats have their unique advantages and limitations. Understanding these can significantly impact your photography results. Some photographers swear by the simplicity of JPEG, while others advocate for the editing power of RAW. But which one is truly better for your needs?Pros And Cons
The decision between JPEG and RAW often boils down to the pros and cons of each. JPEGs are universally recognized and easy to share. They’re smaller in file size, meaning you can store more photos on your memory card. However, they compress data, which can lead to some loss in detail. RAW files, on the other hand, capture all data from the camera’s sensor without compression. This means higher quality images and more detail. Yet, this comes at the cost of larger file sizes and the need for specific software to view and edit these files.Editing Flexibility
Editing flexibility is where RAW files truly shine. If you love tweaking photos, RAW offers unparalleled control. You can adjust exposure, white balance, and even recover details from shadows and highlights that JPEGs simply can’t match. On a recent trip, I shot a stunning sunset in RAW. I was able to adjust the colors to perfectly reflect the scene’s vibrant hues. Had I captured it in JPEG, much of this flexibility would be lost. Do you often find yourself wishing you could adjust your photos after the fact? If so, RAW might be the better choice for you. Choosing between JPEG and RAW isn’t just a technical decision—it’s about how you want to express your creativity. What stories do you want your photos to tell? And how much control do you need to tell them?Creative Filters
Digital cameras offer a world of creativity. Creative filters are a fun way to explore new possibilities. They transform ordinary photos into unique art pieces. Filters can add drama, enhance colors, or create vintage looks. They are perfect for expressing your personal style.
Using Built-in Filters
Most digital cameras come with built-in filters. These filters are easy to use. They allow quick adjustments to your photos. Popular filters include sepia, black and white, and vivid color enhancements. Sepia adds a warm, old-time feel. Black and white offers a classic, timeless look. Vivid enhances the colors, making them pop.
Experimenting with these filters can be exciting. You can see instant results on your camera screen. This helps you decide which filter suits your vision. Built-in filters save time and offer immediate creativity.
Adding Effects Post-processing
Post-processing allows more control over your images. Software like Adobe Lightroom or Photoshop is popular for this. You can add effects not available in your camera. This includes advanced options like HDR, texture overlays, and gradient maps.
Post-processing is ideal for refining your photos. It lets you adjust light, shadows, and colors. The process can be more detailed and precise. You can create stunning images with a professional touch. It requires some time and learning, but the results are rewarding.

Credit: www.tiktok.com
Frequently Asked Questions
What Are The Best Iso Settings For Beginners?
For beginners, start with ISO settings between 100-400 for daylight shots. This range provides clear images with minimal noise. In low light, consider ISO 800 or higher, but be cautious of increased graininess. Adjust based on your lighting conditions for optimal results.
How Does Aperture Affect Photo Quality?
Aperture controls the depth of field in your photos. A lower f-number like f/2. 8 provides a shallow depth, blurring backgrounds. A higher f-number like f/16 keeps both foreground and background sharp. Adjust aperture based on your desired focus effect and lighting conditions.
Which Shutter Speed Is Best For Action Shots?
For capturing action shots, use a fast shutter speed like 1/1000 or faster. This freezes motion and prevents blur. In low light, combine with higher ISO settings to maintain exposure. Experiment with shutter speed to achieve the perfect balance of clarity and brightness.
How To Choose The Right White Balance?
Choose white balance settings based on your shooting environment. For outdoor daylight, use the daylight setting. For indoor shots, select tungsten or fluorescent based on the lighting. Custom white balance allows precise adjustments for mixed lighting situations. Experiment to achieve natural-looking colors.
Conclusion
Choosing the right camera settings enhances your photography. Explore and experiment with settings. Each scene demands unique adjustments. Understand your camera’s features. Practice is key to improvement. Try different modes for diverse results. Use the ISO wisely for light control.
Aperture affects depth. Shutter speed captures motion. Balanced settings lead to better photos. Don’t fear manual settings. Creativity grows with experience. Keep learning and adjusting. Enjoy capturing beautiful moments. Photography is an ongoing journey. Happy shooting!



