
Have you ever been frustrated by your computer playing sound through the wrong device? You’re not alone.
Setting the default audio device in Windows 10 can sometimes feel like navigating a maze. You want your headphones or speakers to work seamlessly, but the settings can be tricky to find and adjust. Imagine enjoying a movie or a conference call without any hiccups—perfect sound, exactly where you want it.
That’s what we’ll help you achieve in this guide. With simple steps and clear explanations, you can take control of your audio settings and ensure your device delivers the best experience possible. Dive in to discover how easy it is to set your default audio device in Windows 10 and say goodbye to audio troubles. Your seamless sound experience is just a few clicks away!
Credit: m.majorgeeks.com
Accessing Sound Settings
Easily set the default audio device in Windows 10 through the sound settings. Open the Control Panel, navigate to Sound, and select your preferred device under the Playback tab. Confirm your choice by clicking “Set Default”.
Accessing sound settings in Windows 10 is a straightforward process, but it can be a little tricky if you’re not familiar with the steps. Whether you’re setting up a new set of speakers or trying to troubleshoot audio issues, understanding how to navigate these settings is key. Let’s break it down into easy steps so you can manage your audio devices efficiently.Understanding The Importance Of Sound Settings
Before diving into the steps, consider why accessing sound settings matters. Imagine planning a movie night at home and realizing the sound isn’t coming from your high-quality speakers. Frustrating, right? Knowing your way around sound settings ensures you enjoy your media the way it was meant to be heard.Step-by-step Guide To Open Sound Settings
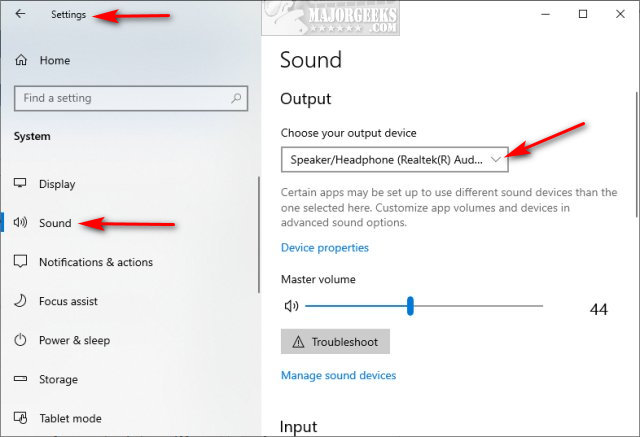
First, locate the speaker icon in the bottom-right corner of your taskbar. A quick right-click on this icon opens a menu with several options. Choose “Open Sound settings” from the list. Alternatively, you can access sound settings through the Start menu. Click Start, then head to Settings > System > Sound. Here, you’ll find all the audio settings you need.Using The Control Panel For Advanced Settings
For those who prefer a more traditional route, the Control Panel offers access to sound settings too. Type Control Panel in the search bar, open it, and go to Hardware and Sound. From here, click on Sound. This method is particularly useful if you’re an advanced user or need to tweak specific audio settings that aren’t available through the standard sound settings interface.Don’t Overlook The Ease Of Access Center
Did you know that Windows 10 offers sound settings within the Ease of Access Center? This feature is designed to help users with disabilities but is beneficial for anyone needing quick access to certain settings. Open the Ease of Access by typing it into the search bar. From there, navigate to Audio to adjust settings like mono audio and display audio alerts visually.Troubleshooting Sound Issues
What if the sound settings don’t solve your problem? Sometimes, restarting your computer or updating the audio driver can help. If you’re still facing issues, consider using the troubleshoot feature within the sound settings. Engage with your settings: What device do you use most for audio? How often do you adjust your settings? Understanding these preferences can make accessing sound settings a breeze and enhance your overall experience with Windows 10.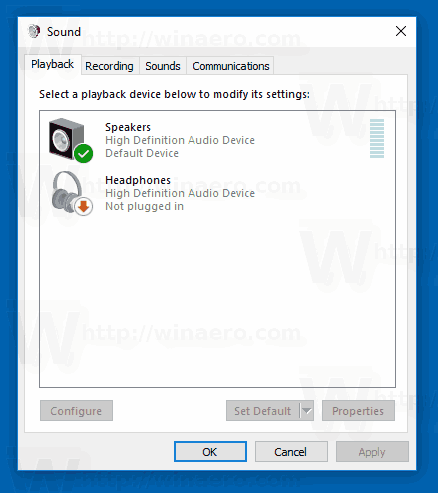
Credit: winaero.com
Choosing Default Playback Device
Ever wondered why your favorite song doesn’t sound quite right? It might be the audio device you’re using. Selecting the default playback device in Windows 10 ensures your audio plays through the right equipment, be it speakers, headphones, or a high-end sound system. This simple tweak can transform your listening experience. Imagine tuning into your beloved podcast only to find the sound echoing through the wrong device. Frustrating, right? Let’s make sure that doesn’t happen to you.
Navigating To Playback Tab
Begin your journey by right-clicking the sound icon in the system tray. This icon, often nestled in the bottom right corner, is your gateway to better sound.
Choose ‘Sounds’ from the menu that appears. This directs you to the Sound window, your command center for audio settings.
Once there, switch to the ‘Playback’ tab. This tab lists every available playback device connected to your computer.
Selecting Desired Device
Now, you have a list of all connected audio devices. This includes everything from built-in speakers to Bluetooth headphones.
Look for the device you use most often. Maybe it’s the sleek Bluetooth speaker that elevates your Netflix nights, or your gaming headset.
Click on your preferred device. A simple click highlights your choice, getting it ready for the final step.
Setting As Default
With your device selected, it’s time to set it as the default. Click the ‘Set Default’ button located at the bottom of the window. This action marks your chosen device as the primary audio output.
Feel the difference instantly. Your device is now the default, ensuring all sound output goes through it.
Why settle for subpar sound? Take control and enjoy every beat, word, and note with your preferred device at the forefront.
Configuring Default Recording Device
Changing the default audio device in Windows 10 is simple. Access sound settings via the control panel. Choose your preferred device, then set it as default. Enjoy better sound with your chosen device.
Configuring the default recording device in Windows 10 is essential for quality audio. Whether for work or leisure, choosing the right microphone enhances sound. Follow these simple steps to set your preferred device effortlessly.Navigating To Recording Tab
Begin by accessing the sound settings. Right-click the speaker icon in the taskbar. Select ‘Sounds’ from the menu that appears. A new window opens. Click on the ‘Recording’ tab. This tab lists all available microphones.Selecting Desired Microphone
In the ‘Recording’ tab, locate your preferred microphone. Ensure it is connected properly. If not visible, check connections. Click on the microphone to highlight it. This step is crucial for proper selection.Setting As Default
Once highlighted, click the ‘Set Default’ button. This button is at the bottom of the window. Confirm your choice by clicking ‘Apply’ and then ‘OK’. Your microphone is now the default device. Enjoy clearer audio recordings with ease.
Credit: learn.microsoft.com
Troubleshooting Common Issues
Many users face issues with audio devices in Windows 10. Setting the default device sometimes doesn’t solve the problem. Understanding common issues can help fix these audio troubles.
Device Not Listed
If your device is not listed, check the connection first. Ensure cables are secure and the device is powered on. Sometimes, Windows fails to detect new devices. Restart your computer to refresh system settings. Open ‘Sound Settings’ and see if the device appears.
No Sound Output
No sound often indicates muted settings. Check the volume icon in the taskbar. Make sure your audio is not muted. Verify the default device in ‘Sound Settings’. Ensure the correct device is selected. Test audio by playing a sound file. If sound persists, replug your audio device.
Driver Update
Outdated drivers cause many sound issues. Access ‘Device Manager’ to check driver status. Right-click on your audio device and select ‘Update Driver’. Choose ‘Search automatically for updated driver software’. This ensures your device works with the latest updates.
Optimizing Audio Settings
Optimizing your audio settings in Windows 10 can significantly enhance your overall experience, whether you’re working, gaming, or just relaxing with some music. It’s not just about getting the volume right. It’s about refining every aspect of your audio to suit your preferences. Think about the last time you struggled to hear dialogue in a movie or missed a beat in your favorite song. Optimizing your audio settings can be the key to avoiding these frustrations.
Adjusting Volume Levels
Getting the right volume level is crucial. You don’t want your speakers blasting unexpectedly. Access the sound settings by right-clicking the speaker icon in the taskbar and selecting “Open Sound settings.” Here, you can adjust the volume for your default device. You might find it handy to balance the volume of different apps using the “App volume and device preferences” feature. Imagine smoothly transitioning from a conference call to your favorite playlist without scrambling for the volume control.
Enhancing Audio Quality
Quality matters, especially if you’re an audiophile or enjoy crystal clear sound. In the “Sound Control Panel,” select your default audio device and click on “Properties.” Navigate to the “Advanced” tab to set the bit rate and frequency. This simple tweak can make your music sound richer. Have you noticed that a small adjustment in quality settings can make even familiar tracks feel new?
Customizing Sound Effects
Customizing sound effects can add a personal touch to your audio experience. In the “Enhancements” tab of your audio device properties, you can explore options like Bass Boost or Virtual Surround. These settings allow you to tailor the sound output. It’s fascinating how a slight bass boost can elevate your favorite songs or how virtual surround can immerse you in a movie. What sound effect would enhance your listening experience the most?
By focusing on these aspects, you can ensure your audio settings are not just set to default but are optimized for your unique needs. Take a moment to make these adjustments, and you might find your daily audio interactions more enjoyable.
Utilizing Third-party Tools
When it comes to setting your default audio device in Windows 10, third-party tools can be a lifesaver. They offer features that can enhance your audio experience beyond the basic Windows settings. Whether you’re a gamer, a music enthusiast, or someone who just loves seamless audio transitions, these tools can simplify your life.
Popular Audio Management Software
Numerous audio management software options are available, each with unique features. Voicemeeter is popular among users for its virtual mixing capabilities. It allows you to route audio from various sources to different outputs effortlessly.
Audio Switcher is another handy tool, especially if you regularly switch between headphones and speakers. It can even automate switching based on your preferences.
Have you ever tried CheVolume? It’s great for managing audio on a per-application basis. Imagine controlling the volume for each app separately without affecting others. That’s the level of control CheVolume offers.
Integrating With Windows Settings
Integrating third-party tools with Windows settings is easier than you might think. Most of these software have user-friendly interfaces that guide you through the setup process. They often sync seamlessly with Windows, ensuring no conflicts arise.
After installation, these tools usually allow you to select your default audio device directly from their interface. This can save you the hassle of navigating through Windows’ sometimes complex audio settings.
Have you ever wondered how these tools enhance functionality? They work in tandem with Windows’ existing settings, offering additional customization options without overwriting your default configurations. This means you can enjoy enhanced audio control without sacrificing system stability.
When was the last time you struggled with audio settings? Consider giving one of these tools a try, and you might find your audio management becoming a breeze.
How do you manage your audio devices? Share your experiences and any tools you’ve found helpful in the comments below!
Frequently Asked Questions
How Do I Change The Default Audio Device?
To change the default audio device, right-click the sound icon in the taskbar, select ‘Open Sound settings,’ and choose ‘Playback. ‘ Then, select your desired device and click ‘Set as Default. ‘ This ensures your preferred audio device is used for sound output.
Can I Set Multiple Default Audio Devices?
No, Windows 10 allows only one default audio device for playback. You can manually switch devices as needed, but only one can be set as default at a time. This ensures consistent audio output through your chosen device, preventing confusion between multiple sources.
Why Is My Audio Device Not Listed?
If your audio device isn’t listed, ensure it’s properly connected and powered. Check for updated drivers in ‘Device Manager. ‘ Restart your PC if necessary. Sometimes, a simple reboot resolves connectivity issues, making your audio device appear in the list.
What If Sound Is Not Coming From The Default Device?
If sound isn’t coming from the default device, check connections and volume settings. Ensure the device is set as default in sound settings. Also, verify that drivers are updated. Troubleshooting these aspects often resolves issues with sound output.
Conclusion
Changing your default audio device on Windows 10 is simple. Follow the steps outlined above, and you will enjoy better sound management. This process helps you control where your audio plays. Whether using speakers or headphones, set your preference easily.
Clear audio improves your experience with games, music, or movies. Remember, the right setup makes a difference in sound quality. Explore your settings and adjust as needed. Troubleshoot if problems occur. Ensure your device drivers are up-to-date for smooth operation.
Embrace the flexibility Windows 10 offers in audio settings. Enjoy enhanced audio experiences every day.



